Turn on Microsoft Defender for Office 365, apply the Standard preset to a pilot group first, and confirm SPF, DKIM and DMARC are correctly published before you touch impersonation settings. Once that pilot holds for a week without disrupting legitimate mail, enable mailbox intelligence, tighten thresholds where needed, and lock in a quarantine and reporting workflow so the whole thing runs itself.
TL;DR:
- Proper DNS authentication with SPF, DKIM, and DMARC must be verified and correctly configured before enabling impersonation protections to prevent legitimate mail from being blocked.
- Microsoft recommends using preset security policies like Standard initially, then adjusting thresholds based on monitoring quarantine volume and false positives during pilot testing.
- Impersonation protection should prioritize key identities such as executives and finance teams, with domain monitoring including close lookalike domains even if they seem redundant.
- Ongoing DMARC monitoring through reports and gradual enforcement is critical to avoid disrupting legitimate automations while preventing domain spoofing.
- Regular quarantine reviews and real-world testing are essential, complemented by professional support to adjust policies based on actual mail patterns and threat evolution.
Table of Contents
- Built-in protection vs Microsoft Defender for Office 365: what’s the real difference?
- How do you create and manage anti-phishing policies?
- Which preset security policy should you use: Standard or Strict?
- How do you configure impersonation protection and mailbox intelligence?
- Are your SPF, DKIM and DMARC records actually working?
- How should quarantine and phishing reports work day to day?
- How do you verify your phishing protection is actually working?
- What does a single maintenance window rollout actually look like?
- Where in-house teams get stuck, and where a managed partner earns their fee
- The gap between best practice and what actually gets implemented
- Get your Microsoft 365 phishing protection properly configured, not just switched on
- Microsoft documentation worth bookmarking
- Sources
- FAQ
Built-in protection vs Microsoft Defender for Office 365: what’s the real difference?
Every Microsoft 365 mailbox already ships with anti-spam, anti-malware, and basic spoof intelligence switched on. That’s the free tier, and it catches the obvious stuff: bulk spam, known malware signatures, mail spoofing your own domain. What it doesn’t do is spot a convincing email pretending to be your finance director, sent from a lookalike domain registered last week.
That gap is exactly what Microsoft Defender for Office 365 (MDO) closes. Built-in security protects all cloud mailboxes; MDO adds a distinct layer on top, and the difference matters enormously if your organisation has ever been targeted by a business email compromise attempt.
MDO gives you:
- Impersonation protection for named users and domains, so a spoofed “CEO” email gets flagged even when it passes standard spam checks.
- Configurable phishing thresholds, letting you dial sensitivity up or down instead of accepting a fixed cut-off.
- Safe Links and Safe Attachments, which detonate URLs and files in a sandbox before a user ever clicks them.
- Campaign Views, which group related attacks together so you can see if your organisation is being hit as part of a wider push, not a one-off.
Relying on the defaults alone means you’re trusting signature-based detection against attackers who now write near-perfect English and register domains that differ from yours by a single character. Behavioural analysis and machine learning, not keyword matching, is what catches those, according to Microsoft’s own anti-phishing documentation. If your licensing includes Defender for Office 365 Plan 1 or 2 (bundled into Business Premium and various E5/E3 add-ons) and it isn’t switched on, you’re paying for protection you aren’t using.
How do you create and manage anti-phishing policies?
Anti-phishing policies live in the Microsoft Defender portal under Email & collaboration > Policies & rules > Threat policies > Anti-phishing. Microsoft’s configuration documentation confirms you can build custom policies scoped to specific users, groups or domains rather than applying one blanket setting tenant-wide, which matters if finance and HR need tighter rules than the general staff population.
To build a policy through the wizard:
- Open the Anti-phishing page and select Create.
- Name the policy and set the applied to condition: users, groups, or domains. Be precise here, because a group filter and a domain filter behave differently, and a misapplied filter is one of the most common causes of mail landing in the wrong place.
- Configure impersonation settings (covered in detail below).
- Set the phishing email threshold using the slider, selecting a level that adjusts sensitivity from less to more aggressive.
- Define actions for detected messages: quarantine, add a safety tip, or redirect.
- Add trusted senders and domains for anything you know will otherwise trip a false positive, such as a payroll provider or a newsletter platform.
- Review and save. New custom policies sit alongside the default policy, and priority order determines which one applies when a recipient matches more than one.
Every setting here has a PowerShell equivalent, which matters if you’re scripting deployment across multiple tenants. New-AntiPhishPolicy creates the policy itself; New-AntiPhishRule binds it to recipients and sets the priority. Run Get-AntiPhishPolicy | Format-List Name,Enabled,PhishThresholdLevel afterwards to confirm the policy is live and check the threshold actually took effect, since a typo in a script can silently leave you on the default.
You’ll need Security Administrator or Global Administrator rights (or the more scoped Organization Management role in Exchange Online) to make any of these changes. If you can see the anti-phishing page but the Create button is greyed out, that’s almost always a permissions issue rather than a licensing one.
Pro Tip: Before you save a custom policy, check its priority number against every other anti-phish policy in the tenant. Microsoft evaluates policies in priority order and stops at the first match, so a broad low-priority policy can silently override a tightly scoped one you built for finance.
Which preset security policy should you use: Standard or Strict?
Microsoft recommends applying the Standard or Strict preset security policies rather than hand-building every setting, because presets update automatically as Microsoft refines its detection logic. Building your own custom policy from scratch means you’re responsible for keeping it current, and most teams don’t have the bandwidth.
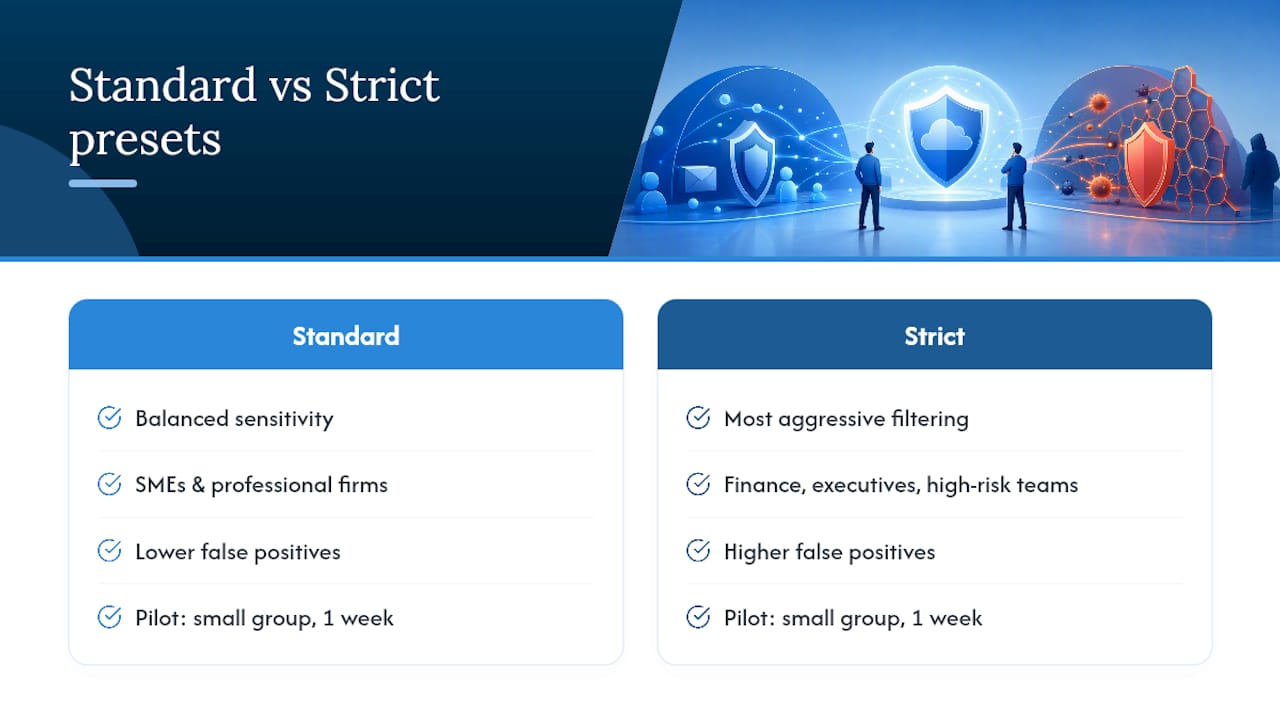
Phishing thresholds vary from Standard to Strict sensitivity levels, with the lowest providing balanced detection and the highest offering the most aggressive filtering.
Standard suits most SMEs and professional firms with normal email volume and a reasonably predictable set of external contacts. Strict makes sense for finance teams, executive mailboxes, or any organisation that has already had a close call with business email compromise, but it will catch more legitimate mail in the net.
Never flip the whole tenant to Strict on day one. Pilot it against a small group first, ideally IT and one or two other departments, for a full working week. Watch quarantine volume daily. If legitimate mail (supplier invoices, automated CRM notifications, newsletter platforms) starts getting caught, that’s your rollback trigger: add the sender to the trusted list rather than abandoning the stricter threshold entirely. Microsoft also offers a 90-day Defender for Office 365 trial through the portal’s trials hub if you want to test Strict-level features before committing to a licence tier.
How do you configure impersonation protection and mailbox intelligence?
Impersonation protection is where MDO earns its keep against the attacks that actually cause damage: a fraudster spoofing your finance director’s name, or a domain one character off from your own. You define user impersonation protection by adding named individuals (typically the CEO, CFO and other executives) whose display names attackers are likely to fake, and domain impersonation protection by listing your own domain plus any close partner domains you want watched for lookalikes.
Mailbox intelligence is switched on by default and quietly learns who each user actually corresponds with, flagging messages that claim to be from a frequent contact but don’t match that contact’s usual sending pattern. The setting that actually lets this intelligence act on what it learns, rather than just observe, is off by default according to Microsoft’s own configuration guide and needs to be manually enabled inside the policy.
Priority order for who gets the tightest impersonation rules:
- Executives and their assistants — the most commonly spoofed identities in invoice fraud and wire transfer scams.
- Finance and accounts payable — the team actually authorising payments based on what they read.
- HR — frequently targeted for payroll redirection scams and W2/P60-style data requests.
Pro Tip: Add your own domain to the impersonation protection list even though it sounds redundant. It’s what catches attackers registering a domain that’s visually near-identical to yours, like swapping a lowercase “l” for a capital “I”.
Are your SPF, DKIM and DMARC records actually working?
None of the above matters much if your DNS authentication is broken, because SPF, DKIM and DMARC are what stop attackers spoofing your domain in the first place rather than just detecting it after the fact. MDO’s impersonation and phishing detection layer on top of authentication; they don’t replace it.
Run through this checklist before you touch any Defender policy:
- Check your SPF record resolves correctly and includes all legitimate sending sources (your email marketing platform, CRM, invoicing software). A common failure mode is a new tool added to the business without anyone updating the SPF record, which then either fails silently or gets tightened out of existence when someone hits the ten-lookup limit.
- Verify DKIM signing is enabled for your domain in the Defender portal under Email authentication settings. Unsigned outbound mail is far easier to spoof convincingly.
- Publish a DMARC record, starting in monitoring mode (
p=none). This tells receiving servers what to do with mail that fails SPF or DKIM, but doesn’t yet enforce anything. - Watch the DMARC aggregate reports for two to four weeks. You’re looking for legitimate sources failing authentication before you tighten anything.
- Progress to
p=quarantine, then eventuallyp=reject, only once reports show clean pass rates from every legitimate source.
Jumping straight to p=reject without the monitoring stage is the single most common DMARC mistake, and it typically breaks something like a CRM notification stream or an automated email sequence that a marketing tool sends on your behalf. A DMARC policy left at p=none indefinitely, on the other hand, gives attackers free rein to spoof your domain with no consequence at all.
How should quarantine and phishing reports work day to day?
High-confidence phishing is quarantined by default, and only admins can release it unless you deliberately open up user self-release, according to Microsoft’s quarantine documentation. For most organisations, that default is correct: the messages landing here are the ones most likely to be genuinely dangerous, and giving users a release button undoes the point of catching them.
A workable operational setup looks like this:
- High-confidence phishing: admin-only release, no user notification of quarantine (reduces social-engineering risk of a user releasing something they shouldn’t).
- Standard phishing/spam: user notification enabled, with a self-release option after a defined review window.
- User-reported messages: enable the built-in Report Message or Report Phishing add-in so staff can flag suspicious mail with one click, feeding submissions straight into the Defender portal’s admin submission queue.
- Admin review SLA: commit to reviewing quarantined and reported items within a fixed window, ideally same working day, so legitimate mail isn’t stuck for a week.
- Audit logging: keep quarantine release and submission actions logged for compliance review, particularly if you operate in a regulated sector.
Neglecting to define this workflow upfront is a frequent source of business disruption, since nobody knows who’s meant to be checking the quarantine folder until an invoice goes missing and someone escalates.
How do you verify your phishing protection is actually working?
Enabling a policy isn’t the same as confirming it works. The Impersonation insight report inside the Defender portal shows exactly which senders and domains have been detected impersonating your protected identities, and it’s the fastest way to see if your executive protection list is actually catching anything or just sitting there unused.
Campaign Views groups related phishing attempts together, so a wave of similar emails hitting different mailboxes shows up as one coordinated campaign rather than dozens of isolated incidents; that’s useful for spotting whether your organisation is being specifically targeted or catching generic spray-and-pray mail. Threat Explorer lets you search historic mail flow by sender, subject or detection type, which is where you go when someone asks “did we get that phishing email too?”
After every policy change, run a short verification pass:
- Send a test message from an external mailbox that mimics a common phishing pattern and confirm it’s caught as expected.
- Check the message header for authentication results (SPF, DKIM, DMARC pass/fail) rather than trusting the inbox display alone.
- Review zero-hour auto purge (ZAP) activity, which retroactively pulls delivered mail back into quarantine when a threat is identified after delivery.
Cross-reference detection volume against the Gov when reporting to leadership. It gives useful sector-level context for how common phishing attempts are across UK organisations, which helps justify the time spent tuning these policies to people outside IT.
What does a single maintenance window rollout actually look like?
Before touching anything, export your current anti-phishing policies with Get-AntiPhishPolicy | Export-Csv, confirm you hold Security Administrator rights, and note who’s on the pilot group.
- Verify SPF, DKIM and DMARC resolve correctly using a DNS checker.
- Apply the Standard preset to your pilot group and confirm it’s active with
Get-AntiPhishPolicy. - Enable mailbox intelligence action and impersonation protection for named executives.
- Send test messages and check header results.
- Monitor quarantine volume daily for seven days.
- Adjust thresholds or trusted sender lists based on what gets flagged.
- Communicate the change to staff before wider rollout, so nobody panics the first time a legitimate email lands in quarantine.
Pro Tip: Do this on a Tuesday or Wednesday, never a Friday. If something breaks, you want a full working week ahead of you to fix it, not a weekend of unanswered support tickets.
Where in-house teams get stuck, and where a managed partner earns their fee
Policy complexity is rarely the hard part. What trips up internal teams is DMARC enforcement, because it requires patience most businesses don’t budget for, and triage capacity, because someone has to check quarantine every single working day without exception.
Cloud 9 handles the rollout, tuning and ongoing monitoring as part of its Microsoft 365 support service, so thresholds get adjusted based on real mail patterns rather than left on defaults indefinitely. That matters most for firms without a dedicated security resource watching quarantine daily. Full case studies are in development and will sit alongside this guidance in future updates.
The gap between best practice and what actually gets implemented
Most phishing protection advice reads like a features list: turn this on, enable that, done. The reality is that policies decay. A trusted sender list built in January is missing three new suppliers by June. A DMARC record left at p=none because nobody scheduled the follow-up review sits there for years, offering precisely nothing beyond visibility.
What the evidence actually supports is a smaller, more disciplined claim: pilot everything, verify with real data before widening scope, and treat quarantine review as an operational task with an owner and a deadline, not a background chore. Conventional advice underweights that last part badly. It’s easy to find guidance on which slider to move; it’s much harder to find guidance on who checks the quarantine folder every Monday morning, and that gap is where most phishing incidents actually slip through.
If you take one thing from this guide, prioritise the DMARC monitoring stage over the impersonation settings. Impersonation protection catches individual attacks after the fact. A properly enforced DMARC policy stops your own domain being weaponised against your customers and partners in the first place, and that’s a harder thing to undo once it’s happened.
— Rob
Get your Microsoft 365 phishing protection properly configured, not just switched on
Cloud 9 is the practical alternative to leaving this to whoever in IT has a spare afternoon: full Defender for Office 365 rollout, threshold tuning based on your actual mail patterns, and ongoing quarantine review so nothing dangerous or legitimate sits unresolved for a week.
Getting the settings right on day one is only half the job. Thresholds drift, new suppliers need allowlisting, and DMARC enforcement needs someone watching the reports before each stage tightens. Cloud 9’s Microsoft 365 support service covers exactly that ongoing tuning, alongside broader managed cloud services for businesses that would rather their systems just work than spend Monday mornings clearing quarantine. If your team is also weighing up conditional access as the next layer of defence, our guide to conditional access policies is worth reading alongside this one. Get in touch to talk through your current setup and where the gaps are.
Microsoft documentation worth bookmarking
Keep these close during configuration and review. The anti-phishing policy configuration guide covers every setting in the portal and PowerShell. Recommended security settings explains Microsoft’s own Standard and Strict preset logic. The anti-phishing protection overview covers spoofing mechanics and DMARC progression in more depth. For UK-specific incident context, the gov.uk breaches survey is the standard reference.
FAQ
Does Outlook do anything about phishing emails?
Yes. Outlook works alongside Exchange Online Protection and, where licensed, Microsoft Defender for Office 365 to filter, flag and quarantine suspected phishing before it reaches the inbox, with a first-contact safety tip shown for unfamiliar senders.
How do I add a phish alert button to Outlook 365?
Enable the built-in Report Message or Report Phishing add-in through the Microsoft 365 admin centre, which adds a one-click reporting button to the Outlook ribbon and routes submissions into the Defender portal’s admin queue.
How can I block phishing emails in Office 365?
Apply the Standard or Strict preset anti-phishing policy, enable impersonation protection and mailbox intelligence, and ensure SPF, DKIM and DMARC are correctly configured, since blocking relies on both detection and authentication working together.
Does Office 365 have a spam filter?
Yes, every cloud mailbox includes built-in anti-spam and anti-malware filtering through Exchange Online Protection by default, with Defender for Office 365 available as an additional licensed layer for phishing-specific threats.
What’s the difference between Standard and Strict preset policies?
Standard applies balanced, moderate thresholds suitable for most organisations, while Strict applies the most aggressive phishing threshold level available and is generally reserved for high-risk mailboxes such as finance and executive accounts.